Written by Allen Wyatt (last updated November 3, 2018)
This tip applies to Word 97, 2000, 2002, and 2003
Subscriber John Jordan asked how it was possible to open a Word document from the Windows Explorer in a manner similar to the Open Read-Only option that appears in Word's Open dialog box. Such an option is not available when right-clicking on a document in Windows Explorer.
Actually, there is a very similar feature that you can use. When you are using Windows Explorer, if you right click on a document you should see a shortcut menu. If the menu has a New option, choose it. (If you don't see a New option, try holding down the SHIFT key as you right-click on the document.) When you select New, Word is started and the document is loaded. However, what is loaded is a new document based on the one on which you right-clicked. The document is named Document1, Document2, Document3, etc. The original is undisturbed, and you can save the new document under any name you wish.
If this doesn't do it for you, you can always add a new Open Read-Only option to the shortcut menu that displays when you right-click on a Word document. This is all done within Windows, not within Word. Follow these steps:
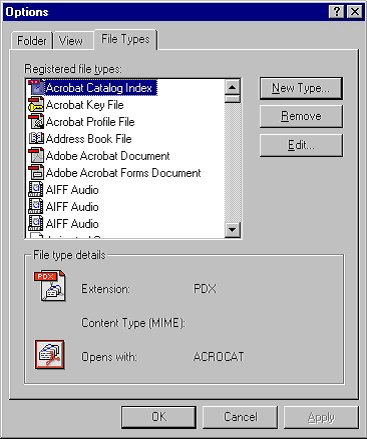
Figure 1. The File Types tab of the Options dialog box

Figure 2. The Edit File Type dialog box
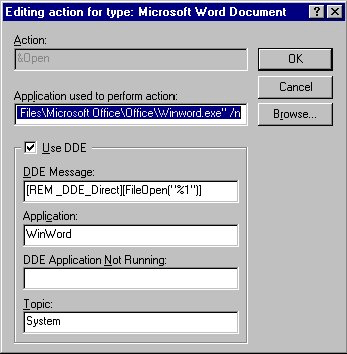
Figure 3. The Editing Action dialog box
[FileOpen ("""%1"""),.ReadOnly]
Now you can right-click on Word documents in Explorer and open them as read-only.
WordTips is your source for cost-effective Microsoft Word training. (Microsoft Word is the most popular word processing software in the world.) This tip (597) applies to Microsoft Word 97, 2000, 2002, and 2003.

Create Custom Apps with VBA! Discover how to extend the capabilities of Office 2013 (Word, Excel, PowerPoint, Outlook, and Access) with VBA programming, using it for writing macros, automating Office applications, and creating custom applications. Check out Mastering VBA for Office 2013 today!
Think you might have a corrupt document? There is no easy way to tell if this is the case, but there are some things you ...
Discover MoreWhat are you to do if you try to open a document and Word automatically closes your previous document? Word is not ...
Discover MoreGot a bunch of text that you've imported from a text file? Need to make it look better? You can take a stab at it with ...
Discover MoreFREE SERVICE: Get tips like this every week in WordTips, a free productivity newsletter. Enter your address and click "Subscribe."
2019-05-23 15:09:44
Dirk Westra
Now that was a really useful tip--much quicker & smoother than having to invoke the Open dialog box in Word, browse for the file, then select Open Read-Only. Thanks for posting this!
Got a version of Word that uses the menu interface (Word 97, Word 2000, Word 2002, or Word 2003)? This site is for you! If you use a later version of Word, visit our WordTips site focusing on the ribbon interface.
Visit the WordTips channel on YouTube

FREE SERVICE: Get tips like this every week in WordTips, a free productivity newsletter. Enter your address and click "Subscribe."
Copyright © 2024 Sharon Parq Associates, Inc.
Comments